
Inhaltsverzeichnis
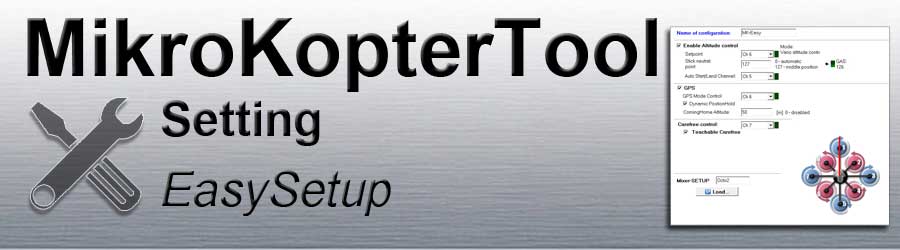
Name of configuration

An individual name can be assigned under Name of configuration.
A different name can be set for each of the five memory locations (Setting) .
Enable Altitude control

The function AltitudeControl can be activated / deactivated here.
When the function is activated, the MikroKopter automatically holds the height as soon as the throttle stick is centered.
Setpoint
A channel can be entered here under 'Setpoint'.
If this channel is assigned to a 2-way switch on the remote control, you can use this to switch the function "Altitude control" ON / OFF.
The function is:ON => The copter automatically maintains the current altitude (when the throttle stick is centered)
OFF => The height must be held manually over the throttle stick position
To activate / deactivate the function permanently, ON or OFF can also be entered as the 'Setpoint'.
Stick neutral point
- Here you have two options:
- Enter a number
If the remote control throttle stick is self-neutralizing
(the stick remains centered as soon as you let go of the stick)The value "127" is entered by default (Info: The setting range extends from 0 - 247 => 127 = centered) The "GAS" channel bar to the right shows the current value of the throttle stick. If this is not 127, you can accept the displayed value
- A "0" for "Automatic"
If the remote control throttle stick is not self-neutralizing
(the stick stays where you let it go)
- Enter a number
Auto Start/Land Channel
A channel (1-16) can be entered here as the value.
If this channel is then assigned to a 2-way switch on the remote control, you can use the Auto Start/Land function.
Condition
In order to be able to use the function, the function AltitudeControl must be switched ON!Function of the switch Auto Start/Land:
switch position OFF (0) => Auto Land
switch position ON (254) => Auto Start
The sequence:
Switch on the remote control and the MikroKopter
The Switch for 'Auto Start/Land' is in position OFF(Auto Land)
Calibrate/activate the copter (throttle up + yaw left) and activate the function AltitudeControl n
- Start the motors.
Slowly move the throttle stick to the middle position - the copter is not yet lifting, as the function AltitudeControl is active.
Move the Switch for 'Auto Start/Land' to position ON => the copter slowly lifts off and stops at a height of ~ 1-2m
(the switch for 'Auto Start/Land' remains in this position during the flight !!! )
- If you want to land, fly the copter back to the landing site, then:
Move the Switch for 'Auto Start/Land' back to position OFF => the copter lands independently
INFO:
If it is windy, the copter may not be able to take off or land straight.
in this case you should intervene manually with the nick/roll stick when taking off/landing.
GPS

The GPS function can be activated / deactivated here.
When the function is activated, the copter can be flown under GPS and additional functions can be used.
GPS Mode Control
Under GPS Mode Control you can set a channel (e.g. CH6).
If this channel is then assigned to a 3-way switch on the remote control, you can use it to switch various functions.
These are:- Switch OFF (0)
=> Free
=> Manual flight
=> GPS/compass support disabled
- Switch center (127)
=> PH
=> Function PositionHold active
=> The copter maintains its current position if Nick/Roll Stick is centered
- Switch ON (254)
=> CH
=> Function ComingHome active
=> The copter flies back to the starting point at ~3m/s
Under GPS Mode Control you can also set PH or CH to activate the function permanently.
Dynamic PositionHold
Here you can activated or deactivated 'Dynamic' PositionHold.
Enabled => If Dynamic PositionHold is enabled, the copter also flies with GPS when sticks 'Nick' and 'Roll' are moved.
When moving the nick / roll stick, the copter is flown to a new position by moving the GPS coordinates
This enables precise positioning even in windy conditions.
The copter flies to the positions a little more slowly.
Disabled => If Dynamic PositionHold is disabled, he copter flies without GPS when sticks 'Nick' and 'Roll' are moved.
The copter is controlled directly by moving the nick / roll stick.
The PH function is automatically deactivated as soon as the sticks (Nick/Roll) are moved
and automatically reactivated as soon as the sticks are centered again.
ComingHome Altitude
- A number from 0 to 247 can be entered here. This value serves as an altitude in meters.
If you activate the function ComingHome the copter is flying back to the HomePosition in the altitude you have set here (1-247m).
If you set here a '0', the copter is flying back to the HomePosition in the current altitude.
Carefree control

Under CareFree control you can set a channel.
If this channel is then assigned to a 2-way switch on the remote control, the function CareFree can be used.
The function:OFF => you fly the copter "by nose"
The front of the copter is every time the forward flight direction.
If you move the Nick-stick forward, the copter flies forward towards the front.
ON => The fly "by nose" is deactivated
When the function is activated, the compass direction in which the red boom points is set as "forward".
If the nick stick is moved forward, the copter flies forward in this compass direction.
If you now turn the copter around its own axis, the set compass direction is still the flight direction "forward" - no matter where the red boom is pointing.
INFO
When using this function, you should stand in the orientation in which the front of the copter points when activating the function.
After that you should NOT turn yourself anymore. Otherwise the direction of flight may be misinterpreted.
Teachable CareFree
Here you can activated or deactivated the function 'With this function the CareFree can be expanded.
With this function the CareFree can be expanded. Depending on the distance between the copter and the starting point, the function can then also be used as a safety function. The function:
The copter is not more then0-20 Meter away from the starting point
If you now activate the function CareFree during flight, the compass direction in which the red boom of the copter is currently pointing is set as the flight direction "forward" (see above "function ON")The copter is more then21 Meter away from the starting point
If you now activate the function CareFree, a virtual line is drawn between the current position of the copter and the start position (no matter in which direction the red boom points). This compass direction of the virtual line is then the forward / backward direction when the nick stick is pressed.
Mixer-SETUP

You can use the Load button in the Mixer SETUP to select the mixer that matches the copter.
Various mixers are available for Quadro, Hexa or Okto copters.
an image is loaded for the selected mixer, showing the motor arrangement and the direction of rotation of the individual motors.
The individual mixers are:
|
|
Quadro |
Quadro-X |


|
|
|
Hexa |
Hexa2 |
Hexa-X |


|
|
|
|
|
Okto |
Okto2 |
Okto2b |
Okto3 |
Okto-U |


