
Inhaltsverzeichnis
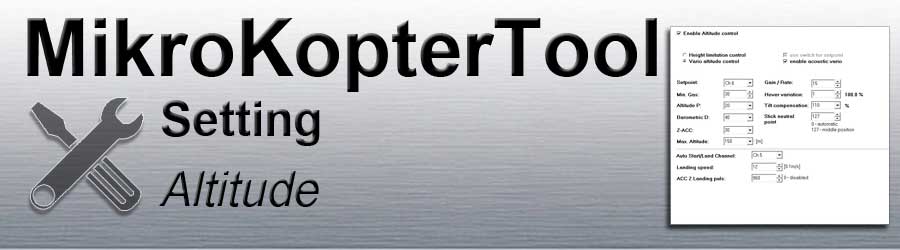
Enable Altitude control

The function of the altitude controller can be activated / deactivated here.
(See also: EasySetup)
Height limitation control

Height limitation control
Function for e.g. Sports pilots with a non-neutralized throttle stick.
Not suitable for waypoint flight.
If the height limitation is activated, a switch or a potentiometer can be used for the height control on the remote control.
With this function, the maximum altitude can be "capped" despite full throttle.
But please note that the height placement with this function is inaccurate.Example Potentiometer
- On the remote control e.g. channel 5 assigned to a potentiometer
- This channel Ch5 is entered here under the Setpoint
If you fly the copter and go full throttle, the copter flies to a certain height and keeps it at full throttle.
This maximum height can now be shifted using the potentiometer on the remote control.
This maximum height can be increased or decreased via the value Gain / Rate .
Example switch
- On the remote control e.g. channel 5 assigned to a 2way-switch
- This channel Ch5 is entered here under the Setpoint
- A check mark has been placed under use switch for setpoint
Switch OFF:
You can fly the copter as high as you want.
Switch ON:
If you fly the copter to a certain height and then switch on the double switch, this height is set.
If you give full throttle now, the Kopter rises a little above this set height and then holds it.
If you switch the switch off again, the set height is deleted.
Vario altitude control
The Vario altitude control is selected by default. The height control takes control of the overall thrust.
The throttle stick on the remote control should have a spring and be self-neutralizing.
The function can then be switched ON / OFF via a double switch on the remote control.
Example
- AOn the remote control e.g. channel 5 assigned to a 2way-switch
- This channel Ch5 is entered here under the Setpoint
Switch OFF:
The speed of the motors is determined depending on the position of the gas stick.
If the gas stick is centered, you have almost half the thrust. Depending on the total weight of the copter, it can either rise or fall. So you have to control manually via the throttle stick the hoover point.
Switch ON:
The altitude control takes control of the overall thrust.
If the throttle stick is centered, the copter maintains the current height (no matter how heavy or light the copter is).
If you move the gas stick up or down, the target height is shifted and the Kopter rises or falls.
If the gas stick is centered again, the copter automatically maintains the new height.
If a check mark is placed next to enable acoustic vario, the remote control can give an acoustic feedback when the copter rises / falls.
Setting 1

Setpoint
A channel (e.g. CH6) can be entered here as the Setpoint.
If this channel is then assigned to a 2-way switch on the remote control, you can use this to switch the function ON / OFF.
Gain/Rate
The value entered here can be used for the function:
Height limitation control the capped height range can be increased / decreased (See: Height limitation control Example Potentiometer)
Vario altitude control the speed of the rate of rise / fall can be influenced
If you move the gas stick up or down, the copter then slows down or slows down
Min. Gas
- Unter diesen Wert wird das Gas nie gestellt, wenn die Höhe überschritten wurde.
Hover variation
- Limits the controller output to the environment of the hover point. Smaller values calm the regulation, but also reduce agility.
ALtitude P
- Dependence on withdrawal of gas at height above. The higher this value, the smaller the flight area above the maximum altitude.
Tilt compensation
The MK accelerates immediately if it is tilted with the height control activated. Usually he does it by a fixed factor.
However, it seems that some MK designs need a little more thrust when tilted. You can now do that with this factor.
Factor less than 100: The MK drops immediately as soon as it is tilted -> after the movement, it then rises again to the target height.
Factor greater than 120: The MK rises as soon as it is tilted -> after the movement, it then drops back to the target height.
- Default is 110%
Barometric D
- Dampens the vibration behavior of the height controller. Even the slightest changes in air pressure have a great effect on gas.
Stick neutral point
Neutral point of the gas stick with respect to the climb and descent rates for the Vario height control.
If the value is zero, the natural hover point of the respective MK is used.
Z-ACC
- Dampens the vibration behavior using the acceleration sensor.
Max. Altitude
A maximum height (in meters) can be entered here.
If the Vario altitude control is switched on, you cannot fly above this altitude.
The value can be entered up to 247 (m).
If you enter a "0", the height limitation is deactivated and you can fly as high as you want.
Setting 2

Auto Start/Land Channel
INFO: This function is only to be used with function Vario altitude control and if the altitude controller is switched on.
A free channel is required which is entered here. This channel is assigned to a double switch on the remote control.
The 2-way switch then has the positions:
Switch OFF => Land
Switch ON => Start
Function
The function Altitude control is switched ON via a 2-way switch on the remote control.
The 2-way switch for Auto Start/Land is in position OFF (Land).
The engines on the copter were started.
The throttle stick is centered.
When now the 2-way switch for Auto Start/Land is switched ON (to "Start"), the engine speed increases slowly and the Kopter takes slowly off.
The copter then stops at a height of ~1-2 meters.
!!! The 2-way switch now remains ON in the "Start" position during flight !!!
When the 2-way switch is switched back OFF (to "Land"), the Kopter goes directly into the vertical landing process.
So take care where you land the copter !!!
After contact with the ground, the engine speed drops after a short time and the engines can be switched off.
INFO: During the landing process, the landing can be overridden at any time with the gas stick or nick / roll.
If the sticks are centered again, the landing will continue automatically.
If you want to interrupt the landing process, the 2-way switch can be set back to ON ("Start").
Landing speed
The value entered here x 0.1m / s determines the sinking speed of the copter during automatic landing.
Default is 12 = 1,2m/s
ACC Z Landing puls
On approach, the MK detects the landing using the acceleration sensor.
If a certain value is exceeded, the MK automatically takes the gas out and your Graupner HoTT transmitter speaks "Landing".
For some types of copter this threshold can be too sensitive. In certain flight maneuvers, the voice output "landing" can be activated unintentionally. The sensitivity can now be set from 760 (sensitive) to 1020 (sluggish). Default is 960.