Inhaltsverzeichnis
Placing waypoints
Up to 200 Waypoints, POI or Failsafe points can be placed on a map. But before you can do this you need a card which is georeferenced.
How to get a map of the place where you will make a Waypoint fly is described here: Waypoint-MAP.
If you have stored an appropriate card, you can open it in the OSD:
After the card has been loaded, waypoints can be stored:
- move the mouse pointer to the place on the map where you want to create a Waypoint, POI or Faisafe point.
a "click" with the right mouse button will place a Waypoint exactly there where the arrow is.

So up to 200 waypoints can be placed at any position.
Each individual waypoint can also be moved and/or converted to a POI or Faisafe point.
see below: Move Waypoint, POI or failsafe point)
WayPoints Editor
In the WayPoints Editor you see all ont he map placed Waypoints, POI or Faisafe points.
Each individual value can here be edited later. Also a deleting of a single Waypoint, POI or Faisafe point is possible here.
You can place your waypoints manually, or with the Neben der manuellen Platzierung kann man auch schnell und einfach mit dem Waypoint Generator.
Information on this can be found further below: Waypoint Generator.
You can open the waypoint Editor
when you place a waypoint on the map with the right mouse button
or
via the menu "WayPoints":


The waypoint Editor consists of four areas:
1 - The menu bar
- Various settings can be made via the menu bar.
More information can be found further below Menu bar.
- Various settings can be made via the menu bar.
2 - The Mission Plan
- In the Mission Plan you find all placed Waypoints, POI and Faisafe points.
More information can be found further below The Mission Plan.
- In the Mission Plan you find all placed Waypoints, POI and Faisafe points.
3 - Waypoints template
- Each placed Waypoint will be set with the value of the Waypoints template.
More information can be found further below Waypoints template.
- Each placed Waypoint will be set with the value of the Waypoints template.
4 - Function buttons
- Via the function buttons you can perform various functions directly .
More information can be found further below Function buttons.
- Via the function buttons you can perform various functions directly .
Menu bar
Via the menu bar various functions can be executed.
Waypoint-List
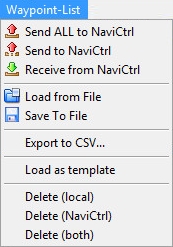
Send ALL to NaviCtrl
Sends all in the map listed Waypoints, POI or failsafe points to then NaviCtrl.
Max. 32 Wegpunkte möglich.
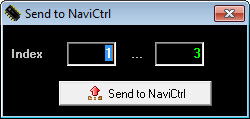
Send to NaviCtrl
With this button you can send a partial area of the listed Waypoints, POI or failsafe points to then NaviCtrl.
If you e.g. plan to fly over a big big field you can fly in steps (depending on the flight time your copter can handle).
Receive from NaviCtrl
You can read all already in Copter charged waypoints, POI or failsafe points and display them in the loaded map.
Load from File
Loadiung of already on your computer stored waypoint flights.
The stored waypoint flight will be pplaced exactly on that place where you have planed it.
Save to File
Save a planed waypoint flight on your computer.
Export to CVS...
- The planned waypoint flight can also be exported to a .csv file.
Load as template
Loading of already on your computer stored waypoint flights.
The stored waypoint flight is here inserted at the point in any map where a marker has been set.
Delete (local)
Delete all Waypoints, POI or failsafe points in the current map view on the computer.
Delete (NaviCtrl)
Delete all waypoints, POI or failsafe points on the copter.
Delete (both)
LDelete all waypoints, POI or failsafe points in the current map view on the computer and the copter.
Waypoint
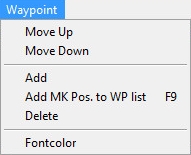
Move Up
Move up the marked Waypoint, POI or failsafe point in the Mission Plan.
Move Down
Move down the marked Waypoint, POI or failsafe point in the Mission Plan.
Add
Place a Waypoint to the point where a marker has been set in map.
Add MK Pos. to WP list F9
Stores the current position of the copter as a waypoint on the map. The same is also performed when you press the button "F9".
(A radio link between copter and computer is required)
Delete
Delete the marked Waypoint, POI or failsafe point in the Mission Plan.
Fontcolor
Select the waypoint Font Color (P1, P2,P3,...).

The Mission Plan
All created Waypoints, POI or failsafe points are entered in the "Mission Plan" in the order in which they were created.
For each Waypoint you will see all set values like altitude, direction or the exact position.
All this values you can change as you want in the Mission Plan.
To do this mark the value of the Waypoint, POI or failsafe point you will change and press "F2" on your keyboard.
Now you can change the values and save it with "Enter".
After you have placed (or changed) a Waypoint, POI or failsafe point on the map, it will appear as follows in the Mission Plan:
Waypoint:
POI:
Failsafe-Punkt:
Assignment in the Mission Plan
If a waypoint is set on the card, the Waypoint template values are adopted for this purpose.
You can find the individual values then as follows:
The meaning of the individual entries in the Waypoint template you can read here Waypoints template.
Editing in the Operation Plan
Each value of an set waypoint can be edited individual in the Mission Plan.
Mission Plan -> Waypoints template
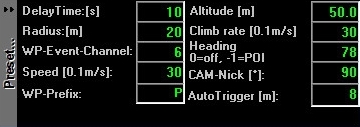
Once a waypoint is placed on the card, the values of the "Waypoint template" are used as default.
Settings
DelayTime: [s]
This is the waiting time of the copter at the waypoint. You can assign each waypoint its own wait time.
The waiting period begins to run as soon as the copter enters the radius of the waypoint.
After the waiting time the copter flies to the next waypoint.
If you set here a "0", the copter will not stay at the waypoint. He flies directly to the next waypoint.
When you use a camera and this should trigger at the waypoint, we have set a fixed "event time" of 2 seconds where the output Out1 is triggering.
If this time is not OK for your camera you can also change this time. The value is set on the microSD card in your FlightCtrl/NaviCtrl in the file "settings.ini" under "MIN_EVENT_TIME".
Radius: [m]
This is the radius around the waypoint. This should be not to small (~10m). This can be helpfully if the copter shall reach the waypoint also on a windy weather. If the range is to small the copter can maybe never reach the waypoint.
In calm weather the copter can easily reach a waypoint even with small radius.
If the copter reach the coordinates of the waypoint (+/- the Radius), it will be confirmed by a sound from the program.
Once this is recognized the "DelayTime" begins to count down. After this "DelayTime" the copter flies to the next waypoint.
More difficult is the attainment of a waypoint in windy / gusty weather.
Here it also can be that the copter can not exactly reach the coordinates of the waypoint.
In that case the copter try and try to reach the exact point, but the wind will prevent this.
So it can be that the copter hold the place very very long and you think that the waypoint flight is stopped.
In this case the "Radius" will help. When the copter reach the Radius the DelayTime starts. Also when the copter never reached the exact coordinates, the copter will fly to the next waypoint after the DelayTime is over.
WP-Event-Channel
With the function "WP-Event-Channel" (Waypoint-Event) you can trigger e.g. a ShutterCable to trigger a camera on a waypoint.
The time you set here defines the switching time of the individual boxes of the bitmask when the copter reach the waypoint.
Speed [0.1m/s]
The speed in which the copter flies to the waypoints can be permanently set on a value:
||<class="MK_TableNoBorder"width="50px":>0||<class="MK_TableNoBorder"width="20px":>=||<class="MK_TableNoBorder">No speed adjustment.
Der Kopter fliegt mit der maximal möglichen Geschwindigkeit zum nächsten Wegpunkt||The copter flies with the maximum possible speed to the next waypoint1 - 247
=
Default speed. Value x 0,1m/s = Speed
Or with the function POTI1-8. So you can change manually the speed with an Potentiometer on your transmitter.
255
=
POTI1 is selected
254
=
POTI2 is selected
253
=
POTI3 is selected
252
=
POTI4 is selected
251
=
POTI5 is selected
250
=
POTI6 is selected
249
=
POTI7 is selected
248
=
POTI8 is selected
WP-Prefix
Each waypoint, POI or failsafe point has a letter in front of the number when it is created.
The standard is "P" (P1, P2, ...).
If you will place many many waypoint etc on your map it can be helpfully when you use different letters.
Here you can set any letter.
Altitude [m]
Here you can set the altitude of the waypoint or POI.
- Waypoint
The altitude you enter determines what amount the copter flies to this waypoint.
- POI
- This altitude is the "line of sight" for a camera (see "Cam-Nick")..
Climb rate [0.1m/s]
If you place waypoints in differnet altitudes you can set here how fast the copter should climb up/down to the next waypoint.
0
=
Climb rate is deactivated.
INFO: The Kopter is not flying to the set altitude (set under Altitude).
To change the altitude (also during flight) you can now use the transmitter.1 - 254
=
Default speed. Value x 0,1m/s = Speed.
INFO: Depending on the set climb value, the copter will increase / decrease slower or faster.
Depending on the set Speed the copter can then reach the preset height of the next waypoint slower or faster. If e.g. the set altitude has not been reached, the copter will continue to rise / fall to the set altitude at the waypoint.
or
255 (AUTO)
=
Automatic speed.
INFO: Depending on the set Speed the required climb rate will be automatically set. So the copter will fly linearly to the next waypoint.

Heading (0=off, -1=POI)
Each waypoint can be given a "line of sight". When the copter reach the waypoint he then looks in this set direction.
(You have to activate the function "CareFree" during this flight)
0
=
The copter did not change the direction of view. The current direction of view is maintained.
(In the editor you see under "Heading" "--")1 - 360
=
the copter aligns itself in the set compass direction (1-360°).
-1
(or P1)=
direction of view is waypoint "P1".
-2
(or P2)=
direction of view is waypoint "P2".
-3
(or P3)=
direction of view is waypoint "P3".
.
.
..
.
.Info:
Each single waypoint or POI in the map has a unique name (letter + number).
So if the copter (the camera) should look in this direction you have to set this letter+number under "Heading".
Cam-Nick [°]
You can set for each waypoint a camera tilt. When the waypoint is reached the camera mount will change tilt in this direction.
0 - 255
=
Depending on the set number of degrees the camera mount tilts.
-1 (AUTO)
=
If you set under "Heading" a POI, the camera tilt in this direction (the set altitude of the POI).
INFO: With a servo gimbal no number of degrees can be determined !
The direction of view of the camera (you set with your transmitter) is "0°".
So if the camera looks straight ahead, this is the 0° position.
If the camera look a little bit up or down, this is the 0° position.


AutoTrigger [m]
If the copter is flying from one waypoint to the next, the copter can take a picture automatically every X meters.
Here you can set at what distance the switching output "Out1" should trigger.
Info
The standard switching time per box of this bitmask is here 10ms. With the bitmask you can individually set how the trigger output Out1 will trigger all X meters.
If needed, you can change the standard time in the file "settings.ini" (AUTO_WP_EVENT) on the microSD card in your NaviCtrl.
Preset
- Clicking on the gray bar "Preset..." will show or hide this window.
Mission Plan -> Function buttons
Different symbols you will find on the left side of the "Mission Plan".
The functions of the symbols are:

Move the highlighted waypoint, POI or failsafe point upward.

Move the highlighted waypoint, POI or failsafe point downwards.

Copy the highlighted waypoint, POI or failsafe point and insert at exactly the same place a new waypoint.

Deletes the selected waypoint, POI or failsafe point.

Sends all in the table existing waypoints, POI or failsafe points to your copter.

Sends a selected number of existing waypoints, POI or failsafe points to your copter.

Receives all at the copter currently loaded waypoints, POI or Faisafe points and displays them in the map.

Only to see if the copter is connected with the computer.
Save up to 4 (with license up to 99) planned WP flights on the microSD card on your copter.
These WP flights can then be recalled via the transmitter.
(see also Graupner Text-Telemetry)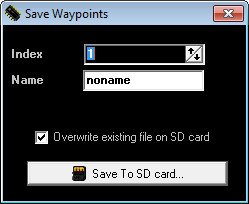
Move Waypoint, POI or failsafe point
You can move each waypoint, POI oder failsafe point on the map quick and easy with the mouse.
To do this place the mouse pointer on the waypoint, POI oder failsafe point you will move. Press and hold the left mouse button and move the waypoint, POI oder failsafe point to the new position.
Waypoint Generator
With the Waypoint Generator you can place quick and easy different waypoints patterns on your map.
So you can plan very fast a grid, a circle or a panorama flight.
You can open the Waypoint Generator via the menu "WayPoints" -> "Generator..." or with this button:

How to use the Waypoint Generator you can see here: Waypoint Generator
Change a Waypoint into a POI or Failsafe point
A click with the right mouse button or with the waypoint generator you can place a waypoint in your map.
Each single waypoint can be changed into a POI or failsafe point.
To do this click with the right mouse button on the waypoint you will change. Then you see a window where you can change it:

-
Change to POI
=>

-
Change to Waypoint
=>

-
Change to Failsafe Point
=>

-
Delete
Example 1: Change existing WP
In an existing waypoint flight we will change one waypoint into a POI and a second into a failsafe point.
In the first step we change WP 5 into a POI:
And in the next step we change WP 3 into a failsafe point:
As you can see, the changed waypoints are no longer in the existing line between the waypoints. Now the waypoints in front and behind are now connected.
Example 2: Set and change an additional WP
In this example we will not change the existing WP flight.
Here we create now in the first step two new waypoints ... and change them then into a POI and a failsafe point.
... and change in the next step one of them (here P9) into a POI ...
... and in the last step the other waypoint (here WP10) into a failsafe point.
Radius for the waypoint flight
A waypoint flight is possible in a radius of 250 meters around the starting point of the copter. With commercial license even 1000m and more are possible.
All waypoints, POI and failsafe points should be set within the possible radius.
If waypoints are set in direct border area or outside this radius, the waypoint can not be achieved and the copter remains at the edge of the radius.
With the function Draw Grid you can display the radius.
The possible starting point is marked by clicking with the left mouse button on the map where you will start the copter.
There is then a crosshair ->  .
.


